Besides the CPL filter, the ND filter is the second most important filter for the travel and landscape photographer. So what is an ND Filter, how does it work and what can you do with it ?
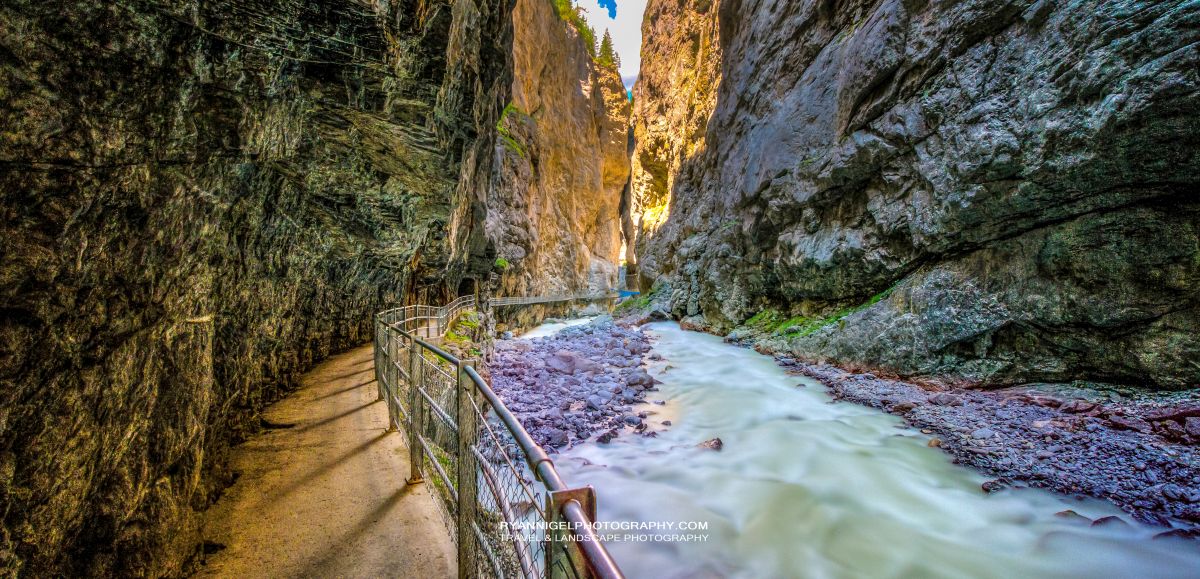
We all know those photos with flowing water, moving clouds, flowing waterfalls and moving seascapes. Most of these photos are made with a ND filter. The ND filter blocks light and allows for longer shutter speeds.
So what means ND ? ND stands Neutral Density. ND is a filter that reduces or modifies the intensity of all wavelengths, or colors, of light equally, hence ‘neutral’, giving no changes in hue of color rendition. It can be a colorless (clear) or grey filter. Ok, so what does it do ? In short: the ND filter blocks light.

Those numbers….
ND filters are numbered. Like ND2, ND64, ND1000, ND2000. They are defined by their Optical Density (OD) which describes the amount of energy blocked by the filter. And here it gets a bit unclear. You see, you got ND3.6 and you got ND4096 (a.k.a ND4000). They are the same. The difference is the notation. ND3.6 refers to the optical density while ND4000 refers to the lens area opening, as fraction of the complete lens. Both are the same and are a 12-stop reduction. My god this looks like math ! Hold on, it’s not that difficult. Suppose you shoot at F4, add 12 stops of F number and you have the F number light reduction you are shooting with. So F32 is +6 stops then you can imagine how dark 12 stops would be.
To make your life a bit less confused, many filter producers add tables to their ND filters. Just look at the table and you will find which ND filter you need to use. Also nearly all filter producers use the NDnumber notation as a standard. In this way everybody can understand what kind of filter it is. Example: ND64 (6-stop reduction) equals ND1.8 equals 1.8 OD. I haven’t seen any filter producer that uses the OD or ND(dot) notation.
Suppose you shoot with a 50mm F1.4 in full bright sunlight. And you need to shoot at f1.4 because you need that shallow depth of field. Your light meter in your camera will scream: ‘Overexposed !’. In this case you can use a ND filter to compensate for the light and still have that shallow depth of view. Also for this example there are tables but it is more and more the creative choice of the photographer to choose which ND filter would be used.
Other example: You want to shoot that flowing water in the waterfall. The strong or harsh daylight would not allow for a slow shutter speed even at the highest F number on you lens. In this case you can use an ND filter. If you don’t want to use the highest F number (because of diffraction) you have to use a darker ND filter. In this case that would be an ND400 or an ND2000 to block the light and get that slow shutter speed. Shutter speeds can be as slow as 2 sec. , 1 minute or more. Depending on the effect the photographer wants to achieve.
Some Tables to make it clear
Below you can see how it all works. I simplified the table a bit. Look up the ND number and then you can see how much light it blocks in F-stops. Example: if you look up ND64 equals 6 F-stops. If your lens aperture is set to F4 for example, you add 6 f-stops to it. So F4 becomes F32 which is the smallest F-stop. This doesn’t mean that your F-stop changes to F32, no ! It’s still F4 (by lens opening) but it only transmit light equal to F32 (because of the filter). The shutter speed will drop dramatically. The light is blocked equal to F32. The shutter speed drops so your depth of view will change too, due to the longer exposure. The longer the exposure the more depth of field.
ND2 – 1 F-stop
ND4 – 2 F-stops
ND8 – 3 F-stops
ND16 – 4 F-stops
ND32 – 5 F-stops
ND64 – 6 F-stops
ND100 – 6 2/3 F-stops
ND128 – 7 F-stops
ND256 – 8 F-stops
ND400 – 8.65 F-stops (also sold as a 9-stop filter)
ND512 – 9 F-stops
ND1024 (AKA ND1000) – 10 F-stops
ND2048 (AKA ND2000) – 11 F-stops
ND4096 (AKA ND4000) – 12 F-stops
ND6310 – 12 2/3 F-stops
ND8192 – 13 F-stops
ND10000 – 13 1/3 F-stops
ND100000 – 16 2/3 F-stops
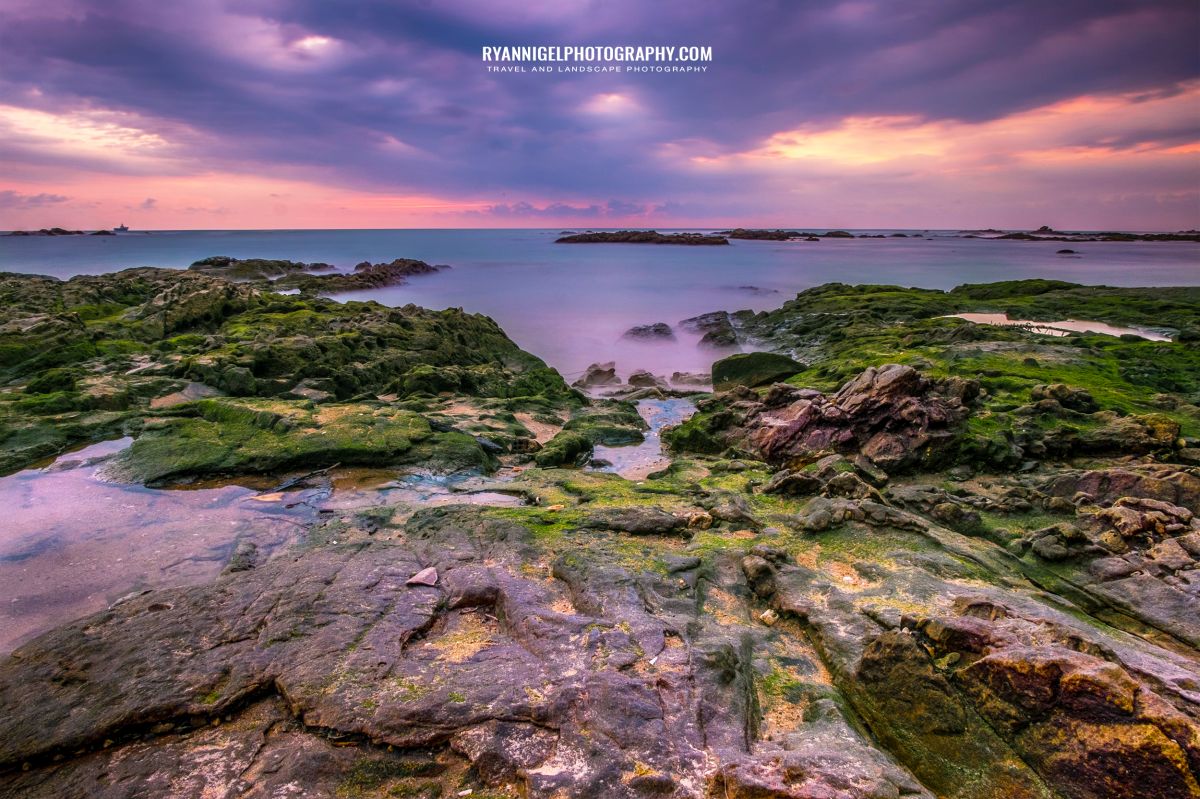
To give you an example of a ND100000: you can shoot a moving seascape in bright sunlight, or you can shoot straight into the full sun.
And here is a table where you can see how the shutter speed drops when using a ND filter. In this example i take a 1/250 shutter speed at a fixed F number. Example: When you look from the view of a landscape photographer who wants to shoot a scene with a moving sky in daylight, the landscape photographer needs to use a ND400 to 1000 to get some movement in the sky. (depending also on the windspeed for movement of the clouds. High windspeeds = faster moving clouds = lesser ND number).
ND0 (No filter) – 1/250
ND2 – 1/125
ND4 – 1/60
ND8 – 1/30
ND16 – 1/15
ND32 – 1/8
ND64 – 1/4
ND100 – 1/2
ND256 – 1 sec
ND400- 1.6 sec
ND512 – 2 sec
ND1024 (AKA ND1000) – 4 sec
Types of ND Filters
You can see where this is going. Do you need to get all the filters ? And do you need to carry it all with you ? Every time ?? In another article you wrote: ‘travel light’ ! Yes i know, and you will travel light. You see, there are different types of ND filters. It is how to choose them.
What you need to learn is to understand light, light intensity and for which purpose do you need it ? Look, a portrait photographer would never use a ND400, more like a ND2 or ND8, while a landscape shooter would use a ND400 more than a ND8. So it really depends on what kind of photography you do.
You have full ND filters, Gradient ND, Reverse ND and filters with various ND numbers (a.k.a. VariND). Before you buy and getting into ND filters it is wise to go online and get all the information you need. Types of ND filters, conversion tables for correct exposure, which brand of filter, possible color casts, how to correct in-camera color cast, your budget of course, etc.
Below i will discuss the Full ND, Gradient ND and VariND filters. These are the most used ones. The others i leave for you to discover 🙂

Full ND Filters
They look like a black, grey or near black piece of glass or resin. The higher the ND number the darker the filter.
These ones come in 2 different types: As a plate or as a round screw-on filter. The screw-on you can easily screw on your lens (check your lens diameter). The plates: mmmmm, that’s a different story. If you want to use plates you need to use a filter holder. Various filter brands offer these filter holders and rings to screw the filter holders to your lens. These plates come in different sizes: 100mm x 100mm, 150mm x 150mm, 90mm x 75mm, etc. so check which filter holder you need. And here it gets tricky ! If you have an ultra wide lens you need to check which filter size you need due to the insane angle of view. The lens manufacturer can provide this information.
ND filters, and also Gradient ND filters, come in different qualities from dirt cheap resins until full glass filters. And so are the prices. Full Glass ND filters give nearly no color cast and give a better image quality. Cheaper resin filters do give color cast and the more you up the ND number the bigger the color cast. In-camera White Balance correction is needed and also color corrections in post are unavoidable.
Gradient ND Filters
A gradient ND is the same as a Full ND but only half the plate is dark. And it goes in a ‘gradient’ from black to a clear transparent part. The GND’s are used when you want the sky ‘moving’ and the lower part, or foreground static. Example: you stand on a rock overlooking the landscape. You want the sky to ‘move’ but the lower part of the landscape static. You can also use the GND when you want to expose for the foreground and compensate the overexposed sky.
GND’s are nearly all plate filters. So you need to use a filter holder as mentioned in the part above. GND filters have the same ND numbers as Full ND filters. So for example: an ND32 GND is the same as an ND32 Full ND. The only difference is that the GND is nearly half transparent. The filtering goes from ND32 to ND0 gradually.
VariND Filters
VariND filters are VARIable ND filters. These are screw-on types and you can get them in any lens diameter. They have advantages but also some disadvantages. So the part ‘vari’ stands for variable, meaning that you have a few ND filters at hand in 1 filter. The filter have a ring and if you turn it, to increase or decrease the ND number and therefore the light transmission.
The VariND filters come in various flavors like the very popular ND2-400. This a 1 to 8-stop ND filter in one ! There is also an ND8-2000 filter (i have one) and this is an 3 to 11-stop ND filter.
Advantages and disadvantages
The advantage of a VariND is that you only have 1 filter with you. And it is a screw-on so you can stack it with a CPL and adding another 2 stops. The disadvantage is that the glass quality is not the same as Full HD Glass ND filter plates. Also the coatings can be of lesser quality, but these things are the trade-off between 1 highly portable filter or a complete filter set.
There is another disadvantage and that is the glass. You see, the ring in front turns the glass. At a certain point, mostly at the darkest setting, you get and ‘X’ on the glass. And you see that in the photo as well. The x-effect occur with wide-angle and super-wide-angle lenses, and even a single polarizer can yield uneven skies with those lenses. The effect is most pronounced in scenes with strong and direct sunlight with lots of clear sky.
X-Effect
How is the X effect created ? Well the VariND is actually 2 stacked CPL filters. When you rotate filter on the lens it gets darker until you reach a point when the polarization reverses and that gives the X. Cheap VariND’s have this effect. If you go for the more pricey ones they don’t have that effect or much less. Try VariND’s from NISI or Syrp. Also the more expensive ones have a mark or indication where the X-effect begins.

What i use
Myself ? I use VariND (ND2-400 and ND8-2000), Gradient ND and Full ND. The VariND’s are screw-on filter and many times i use it in combination with the CPL filter. (see my other post). The Gradient ND and Full ND are plates and you need to put them into a filter holder which can be screwed on your lens using a ring. The filter holder can hold up to 4 filters. Since i am not rich and never will be, i use the Cokin Filter holder/filters. Why these ones ? Well for me, they offer good quality and they do the job. I have to do some color cast correction in post, but that is no problem.
Which one to buy ?
If money is no object and/or you have very rich in-laws, ( 🙂 ) take Benro, NISI and Lee filters. These are among the best you can get. Full HD Glass, scratch proof coatings, good filtering, great image quality. If you are like the rest of us, poor and hard working, you have to get online and swim through the hundreds of brands and qualities. Material, coatings, filter size, compatibility, etc. need to be on your check list.
There are enough websites that do tests. They test not only the expensive ones but also the cheaper ones. If you are after image quality: go for the more expensive ones. And if you can, the glass filters.
If you are a beginner, get a cheap resin set and start training yourself. Master the skills how to use them, how to correct the color casts, etc. It’s a learning curve and it is worth to invest a couple of bucks in it. Once you have mastered the skills how to use them, you can get yourself some more expensive ones.

How i use ND filters
I use the VariND combined with a CPL. Mostly with sunsets and sunset skies. When doing sunset and sunset skies on the beach you need at least an ND400 to 1000 if you want to get some movement in the water and/or sky. Now we all know that the best light comes AFTER the sun has set. Wait for at least half an hour and you get the golden lights, the colored sky and clouds. The light reflects a lot, so it is quite possible that you get high shutter speeds (relative to the visible light).
How to start
To solve this i usually start with a ND8-2000 or ND2-400, depending on the light, and dial it back as the light becomes less and less. I use a fixed aperture of F10 or F12, when the light is still to much i might go down to F16. The ND filter takes care of the rest of the light. Normally i dial down the EV to -2/3 or -1 depending on the brightness of the sky.
I always shoot in A-mode so the camera gives me a matching shutter speed. Anything over 2 sec. will do for me. When i want more and longer movement of the sea or sky i dial up the ND to near maximum and see how the shutter speed comes out. 30 sec is mostly enough for me. My camera max shutter speed in A-mode is 30 sec, so anything after 30 sec i need to do in M-mode.
The end result is in my mind
I don’t really look at what kind of ND number i am. For me it is the combination between Shutter speed – Aperture – ISO. I always use base ISO, on my Fujifilm that is ISO200. Or i use the ‘Low’ setting which is 100. For movement of the sky i look how fast the clouds are moving and count the seconds. In my sunset example i don’t have fast moving clouds so i need 30 sec. or more to get some nice movement. Then it is applying settings to the camera and press the remote shutter release !
Final
That’s my introduction to ND filters ! There is way more info, how to work with stacked filters for example. I hope this little introduction helps you. Get online, get yourself some filters and a filter holder and start shooting. Practice is the best way to learn. Fail, fail twice, fail more ! Learn from your failure ! Don’t feel bad, don’t feel sad ! It’s all a learning curve. Learn from you mistakes ! Now go shoot those moving skies, that flowing water, those nice waterfalls and more !