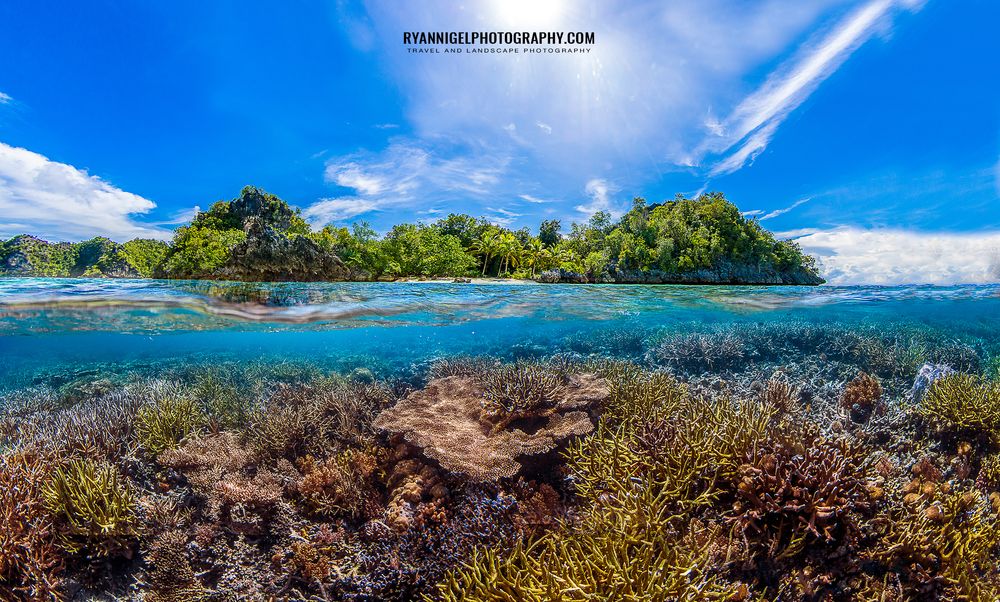
What are 50/50 photos ? Shots like this are half in half out of the water. For example you can see half underwater (coral, rocks, fish, sand, etc.) and half above water (beach, sky, sea, boats, island, etc.).
So how do you make shots like this ? A couple of things. First, You need to be a location where you can do this. So clear waters, something to see underwater and something to see above water. In the shot above you can see an island with trees, rocks and clouded sky. Underwater: colorful corals but sadly no fish. Though the colors from the corals make up enough for the lack of colorful fish. So here you have an example of the ‘setting’. Second equipment.
The Material
And here it becomes tricky. Equipment to shot photos like this can really break your bank. This shot is taken with GoPro 5 Hero and a PolarPro dome. Costs: 350USD for the GoPro 5 and 60USD for the PolarPro Dome. Total: 410USD. This is by far the cheapest option to get shots like this. But the image quality is not what it should be. This shot is heavily edited in Photoshop and Lightroom. Give or take 20min post processing to come to this result. The thing is that you NEED a dome and you NEED wide angle to create this effect. The Dome ‘pushes’ away the water from the lens and creates an ‘open space’ or open field of view for the wide angle lens. The wider the lens the more you get in the frame. Think about 8 to 14mm in full frame terms. A fish eye lens can be used too. But i prefer super wide angle lenses.
Why so wiiiiiidddddeeeee angle ?
You need to know something about water and lenses. When you shoot underwater or half in half out, you have to deal with the effect that water have on the field of view of a lens. For example you have a 24mm wide angle lens. When you use this underwater it becomes a 38mm lens. That’s because of the effect of the water. So the wider you go, the bigger you field of view. And with 50/50 photos: you want a BIG field of view.
The Better Material
If you are after image quality and better colors, take a, high-end compact, mirrorless or DSLR camera in a proper underwater housing. Get a matching dome, preferable from high quality acrylic or comparable material. Also you need sunshades for the dome. So what are the costs ? To start simple 🙂 haha, a Sony 100RX Mk2 or 3 compact camera sets you back around 450USD, a housing from Ikelite around 550USD and a 6″ dome another 375USD. Total: 1375USD. With this set up you can shoot very good underwater photos, half in half out photos, RAW support and amazing image quality. But its gonna cost you. If you have a DSLR or Mirrorless camera you can easily add another 1000USD to that price. And then you got the basics. Adding flash, strobes, lights, filters, etc. can bring your set up north of 5000USD. And if you go for the High End DSLR gear like the Sony A7R mk3, A9 Mk2, Canon 1Dx Mk2 and more, think about 10,000USD. Easy.
The Post Processing
So you emptied your bank account, got divorced and you have been to Raja Ampat. Coming back to your shitty apartment and a place you don’t want to be but have to, ( 🙂 ), it’s time for post processing. And being in a place you don’t want to be, rainy, no sun, grey distressful people, bad food, etc. (like Sweden, haha !) is actually very good. Why ? You can concentrate on your post processing, no distractions.
Workflow
When post processing you also talk about work flow. And here’s mine. First i copy all the photos (i shoot RAW) on to my external SSD. Second, i create a folder named ‘to edit’ and do a quick selection of the photos that i want to edit. Third, i import all those photos in Lightroom. I work with Lightroom but if you have another program that suits you better, please use that one. Then, in Lightroom i start editing only the photos that draw my attention immediately. With editing i mean, i use the Develop module. Straightening, White and Black point, Shadows, Highlights, etc. Once done, i do a second run on all the photos. The ones i didn’t edited. After this, export to a new folder. Then open up Photoshop. In Photoshop i do color corrections, HDR, Black and White (using NIK), detailing and noise reduction (using TopazLabs). And i do each photo 1 by 1. That is a long workflow, but for me, it is very nice and a kind of therapy. 🙂 Not that i am mentally distressed or any thing like that, but i feel in ‘flow ‘ when post processing photos. Like fetish… 🙂 haha no… or is it ??
The time you will use depends on your computer (do you have a powerhouse rig ?) , the number of photos you shot and which ones to process. I am never in a hurry and i will never be. So i take my time. Easy easy 🙂
Techniques
When post processing underwater photos or 50/50 photos. you need to know something about light and how light behaves underwater.
Light
Light is a spectrum of colors. Think ‘rainbow’ and you know the colors. Don’t get stoned or high 😊when thinking rainbows. When light pierces through the water, the blue tropical sea water, it gets filtered. And the deeper you go you loose more color out of the rainbow color spectrum. So after 3 to 5m depth you loose all the red color. Meaning: if you snorkel at the SURFACE but make a photo from something 2 or 3m below you, you loose already 60 to 80% of the red color. That’s why most people who shoot underwater photos get that blue color cast on their photos.
I get a Green color cast !
That is because that lovely seawater is not blue, it is green. Or blue green, or turquoise blue green. You see the filtering of the colors spectrum is different so you get a different color cast. When shooting 50/50 photos or underwater photos in greenish blue tropical waters the light color Magenta is the one you loose first. As Green is the opposite of Magenta, you get a Green color cast.
Correction Technique
You can correct this. Certain cameras have a white balance correction on it. Look for underwater setting in the white balance setting. When you use this setting you get some reds back in the photo but not the amounts that you need.
The way i correct my photos is quite simple. Open Photoshop and open the photo. If its a 50/50 photo and shot with auto white balance the correction is as follows: 1 duplicate layer – 2 select duplicate layer – 3 color balance – 4 add as much red as you need – 5 selection tool – 6 select the part above the water – 7 delete that part. Now you have the underwater part color corrected. If you like you can merge down the copy layer into the base layer.
Of course there are other techniques like color selector and then inverse that color and some other methods. But the way i described above is for me the most simple way to get color back into the underwater part of the photo. The rest you can edit to your own flavor. 😊 Another method is using a white balance slate or a grey or white card. With these slates you can set a custom white balance. Using this you tell the camera what is white in which kind of light. The problem with underwater photography is that every meter you go down, the color spectrum changes so you have to change the custom white balance as well.
So there you have it. How to make 50/50 photos, underwater photos and how to edit them. I hope it was useful !